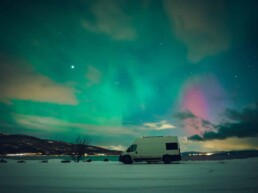
Photographing the Northern Lights is a truly unique experience. To the naked eye, the lights dance across the sky, constantly changing shape and sometimes disappearing within seconds. Capturing that magic with your camera, however, takes a little preparation.
The good news? You don’t need to be a professional photographer to take beautiful Northern Lights photos. With the right equipment, a few basic settings and, above all, a little patience, you can already capture amazing images.
In this guide, we’ll cover the basics of photographing the Northern Lights, from choosing your equipment and setting up your camera to focusing, composing your shots and dealing with the cold. Is it true that they’re more visible on camera/phone than in naked-eye ?
1. What camera do you need to photograph the Northern Lights?
To get started, a camera that allows you to manually control the main settings is highly recommended.
A mirrorless or DSLR camera is particularly well suited because it allows you to control:
aperture;
shutter speed;
ISO;
focus.
Modern cameras with good low-light performance can produce excellent results, but you don’t necessarily need the latest high-end model to get started. Personally we use a Sony Alpha7CII https://link.amazon/B0fJc7K5y
Can you photograph the Northern Lights with a smartphone?
Yes!
Many recent smartphones have a Night Mode or manual controls that can be used to photograph the Northern Lights. Under good conditions, they can produce surprisingly impressive images.
However, a dedicated camera with a bright lens gives you much more control over exposure, noise and focus, making it easier to adapt to changing conditions.
2. Choose the right lens
When photographing the Northern Lights, you’ll usually want to capture as much of the sky as possible, while still including the surrounding landscape.
A wide-angle, fast lens is therefore particularly useful.
For example:
around 14–24 mm on a full-frame camera;
around 10–18 mm on many APS-C cameras;
an aperture of around f/1.4 to f/2.8 is ideal when available.
A wide aperture lets more light reach the sensor, allowing you to use shorter shutter speeds or lower ISO settings.
That said, you don’t need an expensive professional lens to get started. A bright lens you already own may work perfectly well.
3. A tripod is your best friend
This is probably the most important accessory after your camera.
Northern Lights photography often involves shutter speeds of several seconds. Even the slightest movement can make your image blurry.
A stable tripod keeps your camera perfectly still throughout the exposure.
A few tips:
place the tripod on the most stable surface possible;
avoid extending the center column unnecessarily;
use a remote shutter release if you have one;
otherwise, use the camera’s 2-second timer;
if your camera is mounted on a tripod, consider turning off image stabilization if recommended by your camera or lens manufacturer.
In northern regions, wind and cold can also put your equipment to the test, so a sturdy tripod can make a real difference.
4. Basic camera settings for the Northern Lights
There is no single setting that works in every situation.
The brightness and movement of the Northern Lights can vary dramatically. You’ll therefore need to adjust your settings according to the conditions.
Here is a good starting point:
These are starting points, not fixed rules.
Bright and fast-moving aurora
If the aurora becomes very bright or moves quickly, try using a shorter shutter speed.
For example:
1–3 seconds can help preserve the shape and movement of the aurora.
If the image is too dark, you can then increase the ISO or use a wider aperture.
– Faint and slow-moving aurora
When the aurora is weak and moves slowly, a longer exposure may be necessary.
Try:
5–10 seconds, or longer depending on the conditions.
Keep in mind, however, that the longer the exposure, the more likely fast-moving aurora will appear as a soft, blurred glow rather than clearly defined shapes.
5. What ISO should you use?
ISO controls the sensor’s sensitivity to light.
Since you’ll be photographing a very dark scene, relatively high ISO settings are often necessary.
A good starting point is around ISO 1600 or 3200.
Depending on your camera and the conditions, you may need to go higher or lower.
The goal is to find the right balance between:
brightness;
detail;
digital noise;
shutter speed.
It is often better to have a slightly darker but sharp image than an extremely bright photo with excessive noise.
6. Aperture: let in as much light as possible
Most of the time, you’ll want to use your lens at or close to its widest aperture.
If your lens opens to f/2.8, start at f/2.8.
If it opens to f/1.8, you can start at f/1.8, or stop down slightly if you find that your lens performs better at another aperture.
When photographing the Northern Lights, every bit of light can make a difference.
7. Focusing: a crucial step
This is one of the most common mistakes when photographing the Northern Lights.
In the dark, autofocus can struggle to lock onto a subject. Your camera may keep hunting for focus without finding the right point.
It is therefore best to switch to manual focus.
How to focus at night
Before the Northern Lights become active, focus on something very far away, such as a distant light or a bright star.
Zoom in on the camera screen to check that the subject is sharp.
Once your focus is correct, avoid touching the focus ring.
And remember: simply turning the focus ring to the ∞ symbol does not always guarantee perfect focus. Always take a test shot and check your image.
8. Shoot in RAW
If your camera allows it, shoot in RAW rather than JPEG.
RAW files preserve much more of the information captured by the sensor, giving you greater flexibility when editing your photos.
You’ll be able to adjust things such as:
exposure;
highlights;
shadows;
white balance;
colors;
noise reduction.
This is particularly useful for Northern Lights photography, where you’re dealing with a very dark sky and bright, colorful areas.
9. What white balance should you use?
White balance has a major influence on the colors in your image.
When using Auto White Balance, your camera may produce slightly different colors from one photo to another.
For more consistent results, you can set your white balance manually.
A temperature of around 3500–4000 K is a good starting point.
But don’t be afraid to experiment. A cooler setting will give your image a more blue-toned appearance, while a warmer setting can emphasize green and yellow tones.
If you shoot in RAW, you can also fine-tune the white balance later during editing.
10. Don’t photograph only the sky
A great Northern Lights photo isn’t necessarily just about the Northern Lights.
In fact, the landscape is often an essential part of the image.
Try including:
a mountain, a forest, a lake, a cabin, a road, a person, an animal or a van, another recognizable element of the landscape.
The foreground gives the Northern Lights a sense of scale and creates a stronger composition.
A person standing in silhouette beneath a huge aurora, for example, can add a powerful sense of scale to your image.
11. Think about composition before nightfall
When the Northern Lights suddenly appear, it can be difficult to think calmly about composition.
The cold, darkness and excitement of the moment don’t exactly make things easier!
If possible, scout your location before it gets dark.
Look for:
interesting landscape features;
the direction you want to photograph;
nearby artificial lights;
obstacles;
suitable places to set up your tripod.
You’ll save valuable time when the aurora appears.
12. Watch out for light pollution
For the best viewing and photography conditions, get as far away as possible from cities and strong artificial lights or a strong moonlight.
Light pollution reduces the contrast of the night sky and can make stars and auroras harder to see.
A dark sky generally produces richer and more detailed images.
That doesn’t mean you always have to be completely isolated, though. A small village light or a cabin can sometimes become an interesting element of your composition.
The key is to include it intentionally.
13. Protect your equipment from the cold
Photographing the Northern Lights often means spending several hours outdoors, sometimes in temperatures well below freezing.
Cold weather can have a major impact on battery life.
Remember to bring:
at least one spare battery;
enough memory card space;
spare batteries kept warm in an inside pocket;
a headlamp;
gloves that allow you to operate your camera.
You should also avoid moving your equipment suddenly from very cold conditions into a warm room.
Condensation can form on or inside your camera and lens.
A good practice is to place your camera inside a sealed bag before going indoors and let it gradually return to room temperature.
15. Suggested settings for different conditions
Here is a quick reference you can keep with you.
Faint aurora
Try:
f/1.4 to f/2.8
ISO 3200–6400
5–10 seconds
Moderate aurora
Start around:
f/1.4 to f/2.8
ISO 1600–3200
3–6 seconds
Bright and fast-moving aurora
Try:
f/1.4 to f/2.8
ISO 800–1600
1–3 seconds
These settings are only guidelines. Your camera, lens, sky brightness and the speed of the aurora will all affect the final result.
The best approach is to take a test shot, check the result and adjust your settings accordingly.
16. Common mistakes to avoid
– Forgetting about the landscape : A beautiful aurora deserves a foreground that adds context and depth to your image.
Not checking the darkness
Shooting too close to city lights
Forgetting about light pollution
Not scouting your location beforehand
Not bringing spare batteries
Ignoring the weather conditions
Using the wrong focus
Leaving autofocus on : In the dark, your camera may struggle to focus correctly.
Using a shutter speed that is too long: a fast-moving aurora can become blurred and lose its distinctive shapes.
– Forgetting to stabilize the camera Relying entirely on automatic settings: Automatic modes can struggle with extremely dark and high-contrast scenes. Manual settings give you much more control.
– Underestimating the cold : A battery that appears fully charged can drain much faster in freezing temperatures.
17. Do you need a remote shutter release?
A remote shutter release isn’t essential, but it can be useful.
Pressing the shutter button directly can introduce a small amount of camera movement.
If you don’t have a remote, the 2-second self-timer is an excellent alternative.
Some cameras also allow you to trigger the shutter remotely using a smartphone.
Our starting settings for your first Northern Lights photo
If you’re outside and don’t know where to start, try this simple setup:
Manual mode
Aperture: widest available like f2,8 or less
ISO: 3200
Shutter speed: 5 seconds
Focus: manual, set to infinity
White balance: around 3500–4000 K
File format: RAW
Camera: mounted on a tripod
Take a photo and check the result.
Is the image too dark? Increase the ISO or slightly lengthen the shutter speed.
Is the aurora very bright or moving quickly? Reduce the shutter speed.
Is the image blurry? Check your focus and make sure the tripod is stable.
After a few test shots, you’ll quickly find the settings that work best for the conditions.
Photographing the Northern Lights: most importantly, enjoy the moment
Photographing the Northern Lights requires a little technical knowledge, but don’t let the settings make you forget what matters most.
Before looking for the perfect shot, take a moment to simply look up.
The Northern Lights are unpredictable. They can appear slowly, suddenly intensify, spread across the entire sky and disappear just as quickly as they arrived. They are so mystical and magical !
Your camera is there to preserve the memory.
But sometimes, the most beautiful part of the experience is simply putting the camera down and enjoying the show
📌 Northern Lights photography checklist
☐ Camera fully charged ☐ Spare batteries ☐ Memory card ☐ Wide-angle, fast lens ☐ Tripod ☐ Headlamp ☐ Very warm clothes and gloves ☐ Focus prepared ☐ Manual settings ☐ And above all… plenty of patience!